I really discovered Craftsy in September of last year, and I have been thrilled to be able to post my patterns somewhere that people can see and buy them, and it doesn't cost me an arm and a leg to operate it (in fact, it's free!) I've also taken advantage of the amazing classes they offer. I'm enrolled in several of the free ones, but also a few of the paid ones, and they're great! I'm enrolled in Machine Quilting with Wendy Butler Burns, Free Motion Quilting a Sampler with Leah Day, and Sew Retro Perfect Bombshell Dress with Gretchen Hirsch. The format of these classes is so great! You can watch as many times as you want, and if you have questions, you can ask, and the instructors and classmates can answer them for you.
Have you looked through the class list yet? They add new classes every week. Currently, my Craftsy Wish List looks like this:
1. Mastering Foundation Paper Piecing with Carol Doak
2. Free Motion Fillers Vol. 1 with Leah Day
3. Quilting Big Projects on a Small Machine with Ann Petersen
4. Vintage Inspired Veils for the Modern Bride with Doreen Vandermeer
Sigh...I'd love to be a Craftsy instructor one day...Till then, I'll stick to working my way through the classes I'm already enrolled in!

I am a quilt pattern designer, an independent fabric designer, and a quilter for hire. Life's pretty insane most of the time, and sewing is my sanity! I will be posting my sewing adventures here, including stuff I design, patterns I test, awesome tools I might find, and whatever else might strike me at the time. Check out my quilt patterns, fabric designs, and finished items for sale in my stores, in the tabs right below this text.
Thursday, March 28, 2013


Did you know Google Reader is shutting down?
Well, that's what I heard. So if you're following my blog on Google Reader, you may need to find a new way to follow me. Here's one! Follow my blog with Bloglovin and you'll never miss a post :)
You can also follow me on Facebook HERE!
You can also follow me on Facebook HERE!
Wednesday, March 27, 2013
Tried something new today
This morning, I stuck my neck out and decided to try submitting my fabric designs to some fabric companies. I contacted several companies to find out what I have to do, and the one I wanted to send my designs to most was the first to respond. So, since they said I could submit via email if I have an online portfolio, I went ahead and sent them my link! Now, for the grueling 3 week wait to hear back from them...I'll let you know what happens. I have three other companies that I have information for, so I'll go down the list if I get rejected!
New Dear Jane block
I know I'm behind in posting my Dear Jane block photos, but I had to share this one. I've gotten as far as block D-7. But here is block D-5, and my new favorite!

This is a 5" block, made from my Moroccan Tiles fabric design (available HERE) in red/violet. I'm really thrilled with how easily this print fit into this block!

This is a 5" block, made from my Moroccan Tiles fabric design (available HERE) in red/violet. I'm really thrilled with how easily this print fit into this block!
Tuesday, March 26, 2013
Mystery Quilt Clue #2!
Tuesday, March 19, 2013
Brand new MYSTERY QUILT!
If you have been waiting for my next mystery quilt pattern, I'm happy to announce it's ready! And if you haven't been waiting...well, why not? I do hope you'll enjoy it, I've enjoyed writing it and I love the twist I've added at the end!
I have released the fabric requirements, cutting instructions and clue #1 so far (clue #1 came with the cutting instructions). If you are a member of Facebook, you can join my group HERE. I'll be releasing a new clue every Friday until it's done (I believe it's 10 clues, but I'll have to go confirm that!)
If not, you can just download the fabric requirements HERE and cutting instructions and clue #1 HERE.
Please share this page with other quilters you may know who might be interested in participating!
NOTE: You'll either need a set of Tri-Recs rulers or the ability to paper piece in order to complete clue #1!
If you're curious, here's a photo of the fabrics I used for mine.

The yellows are my color 1 light and dark, the blues are my color 2 light and medium, and the red is my color 2 dark (a dark blue would have worked here too). And the birds are my focus fabric.
I have released the fabric requirements, cutting instructions and clue #1 so far (clue #1 came with the cutting instructions). If you are a member of Facebook, you can join my group HERE. I'll be releasing a new clue every Friday until it's done (I believe it's 10 clues, but I'll have to go confirm that!)
If not, you can just download the fabric requirements HERE and cutting instructions and clue #1 HERE.
Please share this page with other quilters you may know who might be interested in participating!
NOTE: You'll either need a set of Tri-Recs rulers or the ability to paper piece in order to complete clue #1!
If you're curious, here's a photo of the fabrics I used for mine.

The yellows are my color 1 light and dark, the blues are my color 2 light and medium, and the red is my color 2 dark (a dark blue would have worked here too). And the birds are my focus fabric.
Sunday, March 17, 2013
My son's new light box
My 9 year old has taken a real interest in drawing lately. He's not great at it, so he wants to start out by tracing some things to get the feel for how to draw certain things. But tracing is hard when you can't really see what you're tracing through the paper you're drawing on! So I decided to try building him a light table. I thought if we could find inexpensive pieces that we can use for other things if he decides he doesn't need it (or he does, and we get him a better one!)
So here's what I did. We were at Home Depot, and we found a clear plastic storage bin with a clear blue lid. It's almost flat, but the middle is indented slightly so pencils won't roll off. Then today, my husband found a 250W halogen work light for $8. We added an extension cord we already had, put the light inside and put the lid on. And here's what we got!

The back picture shows up super clearly through the top paper, and since the lid is blue, it keeps the light from blinding you too much when you move the paper. I might add some kind of shielding to the lid to protect his eyes a little more though. And it's a nice big surface, the only tricky spot is right in the middle, but his notebook sized papers fit fine on one end, with the light in the other end.
That's my frugal project of the day!
So here's what I did. We were at Home Depot, and we found a clear plastic storage bin with a clear blue lid. It's almost flat, but the middle is indented slightly so pencils won't roll off. Then today, my husband found a 250W halogen work light for $8. We added an extension cord we already had, put the light inside and put the lid on. And here's what we got!

The back picture shows up super clearly through the top paper, and since the lid is blue, it keeps the light from blinding you too much when you move the paper. I might add some kind of shielding to the lid to protect his eyes a little more though. And it's a nice big surface, the only tricky spot is right in the middle, but his notebook sized papers fit fine on one end, with the light in the other end.
That's my frugal project of the day!
Friday, March 8, 2013
Hoppy Easter!
Today, I finished writing my latest pattern, for an Easter wall hanging that's perfect for a house with kids. This sample will be going to my preschooler's classroom!


This pattern is available in my Craftsy shop HERE.
Friday, March 1, 2013
Stepping Stones is ready for quilting!
This week I put the final touches on my Stepping Stones quilt top. I added another row of blocks, two 1" borders and one 5" border, to make it bed sized. Here's the final top! What do you think?

This pattern is available in my Craftsy Store, which you can find HERE.

This pattern is available in my Craftsy Store, which you can find HERE.
Thursday, January 31, 2013
Cup-O-Love mug rug pattern
I finished a new mug rug pattern today. This one's a Valentines Day themed project, and it's short and sweet! The pattern is available HERE.


Monday, January 28, 2013
This weekend's completed UFO
My mom got me my first sewing machine when I was 18 (at the time, it was only really for sewing Sigmas on sweatshirts.) One day, I was looking through her stash, and I decided to try my hand at quilting, and straight lines seemed best. So I found three "ugly" floral prints and put them with the cute blue daisy print I'd bought to make a hoodie with sorority letters on it, and set to work. These quarter square triangles are what came of that.


It was a few years before I decided to really try quilting, and subsequently fell in love with the craft. Recently, I started a new facebook group with Genevieve from Gigi's Quilty Treasures for UFO completion because I discovered I had almost 20 UFO's in varying states of incompletion. What's happened since then has been amazing! We have over 170 members since this time last month, and we just held our first UFO Sew Along day this weekend.
So...here's what I did during the sew along. I finally finished with these QST's! This is my table runner. It's also my first attempt at homemade binding, and I'm very happy with it!

That's one UFO done, and lots and lots of happy crafters who were able to spend the day working on and finishing their own projects. We're currently discussing plans to do this twice a month now, and will have prizes to give away during the second sew along each month. Want to join us? Come to facebook and join UFOQueen2013, and be prepared to be motivated!
Wednesday, January 16, 2013
New mystery quilt coming soon!
Gearing up for a new mystery! I got the design sketched up today, and I'm hoping to have the first clue posted at the end of February or so. Interested? You can join in here:
https://www.facebook.com/groups/MysteryQuilt1
If you don't use facebook, that's ok. Send me an email to quiltyshannon (at) yahoo (dot) com and let me know you'd like me to email them to you, and I'll send them as I post them.
I've only started on the fabric math, but I can tell you that you'll need 6 fabrics, one of which should be a focus fabric. Large prints will work well here. You'll need just over 2 yards of that one. I'll have more information as I work it out. Come join in!
https://www.facebook.com/groups/MysteryQuilt1
If you don't use facebook, that's ok. Send me an email to quiltyshannon (at) yahoo (dot) com and let me know you'd like me to email them to you, and I'll send them as I post them.
I've only started on the fabric math, but I can tell you that you'll need 6 fabrics, one of which should be a focus fabric. Large prints will work well here. You'll need just over 2 yards of that one. I'll have more information as I work it out. Come join in!
Tuesday, January 15, 2013
Stained Glass quilt pattern is available!
I have been absent from my blog for a couple weeks, and that's because I've been hard at work on my newest pattern, which is a stained glass design. It was well outside my element, as I rarely do anything scrappy at all. I've never done anything THIS scrappy!
.

I absolutely LOVE how this came out. So I got the pattern all written out, and it's ready for you to make one of your own!
You can find it in my Craftsy store HERE!
I asked a few groups on facebook for suggestions for the name, and the name I used (I modified it slightly) is "Window to My Soul", suggested by Grayson Murray Nelson. Thank you to everyone for your suggestions!
On a side note, coming soon is my next Mystery Quilt! Check out some more info HERE!
UPDATE: This one is now done! See some more photos of my stained glass quilt HERE!
.
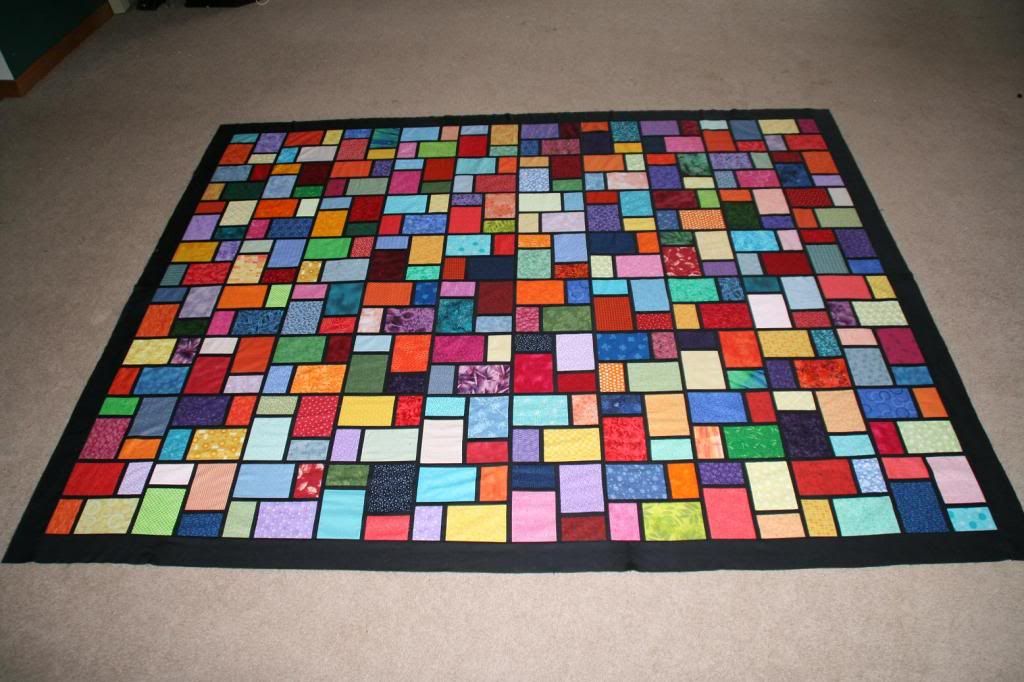
I absolutely LOVE how this came out. So I got the pattern all written out, and it's ready for you to make one of your own!
You can find it in my Craftsy store HERE!
I asked a few groups on facebook for suggestions for the name, and the name I used (I modified it slightly) is "Window to My Soul", suggested by Grayson Murray Nelson. Thank you to everyone for your suggestions!
On a side note, coming soon is my next Mystery Quilt! Check out some more info HERE!
UPDATE: This one is now done! See some more photos of my stained glass quilt HERE!
Friday, January 4, 2013
My 20 minute scrappy pincushion
Since I stabbed myself in the lip on Christmas Eve while rushing to finish my hubby's gift, I have decided to try using a pincushion. I've always been in the habit of holding a few pins in my mouth, but stabbing myself, as well as some other stories I have heard, have made me think twice about it! Plus, it's hard to snack with pins in your mouth hahaha!
I've looked for patterns, and found some I like, but I have so many pins, and sometimes I use a LOT of them (if you know me, you know I hate pinning, but when I use them, I go a little overboard.)
Since this is my first pincushion, I didn't want to spend a ton of time or materials on it. So I decided to take a few minutes to throw something together, so I will have one and can decide how I feel about using one.
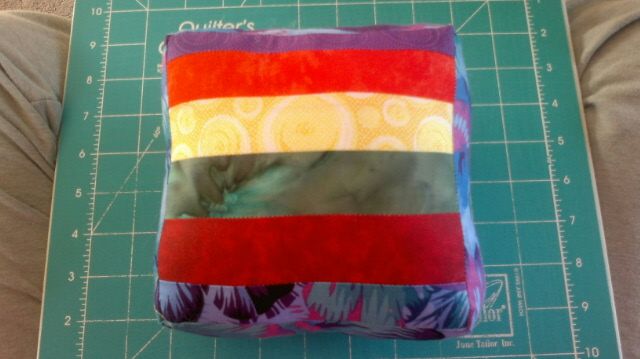
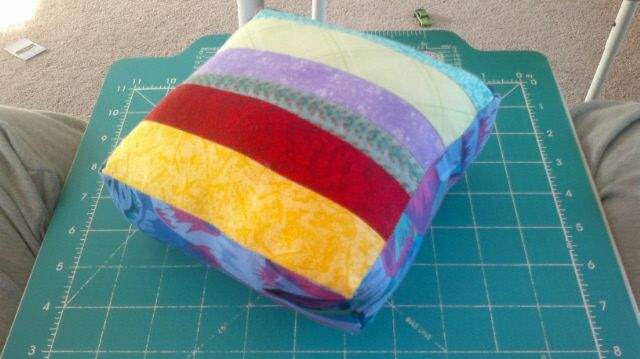
I pulled out some scraps from my scrap box, and sewed some strips together till I had a piece that was about 6 inches square. Then I made another one with more scraps. I sewed a strip around the edges of both pieces, and left an opening to stuff it with the half a bag of hand me down polyester stuffing I had lying around. And then I ladder stitched it shut (by hand?? ME?!? Unheard of!)
And here is the finished product!


I've looked for patterns, and found some I like, but I have so many pins, and sometimes I use a LOT of them (if you know me, you know I hate pinning, but when I use them, I go a little overboard.)
Since this is my first pincushion, I didn't want to spend a ton of time or materials on it. So I decided to take a few minutes to throw something together, so I will have one and can decide how I feel about using one.
I pulled out some scraps from my scrap box, and sewed some strips together till I had a piece that was about 6 inches square. Then I made another one with more scraps. I sewed a strip around the edges of both pieces, and left an opening to stuff it with the half a bag of hand me down polyester stuffing I had lying around. And then I ladder stitched it shut (by hand?? ME?!? Unheard of!)
And here is the finished product!
Wednesday, January 2, 2013
Quillow Pattern is now available
It's done! It's finally done! I finished up the Quillow pattern and got it posted today!
http://www.craftsy.com/pattern/quilting/home-decor/hubbys-quillow---quilt-as-you-go/40615
I didn't include the Beetle block in the pattern because I don't have that ready, but any big block could be used for this. You could even use more strips of fabric and make the pillow look like the top of the quilt.
Anyway, if you've been waiting for this tutorial, it's here!

http://www.craftsy.com/pattern/quilting/home-decor/hubbys-quillow---quilt-as-you-go/40615
I didn't include the Beetle block in the pattern because I don't have that ready, but any big block could be used for this. You could even use more strips of fabric and make the pillow look like the top of the quilt.
Anyway, if you've been waiting for this tutorial, it's here!

Friday, December 28, 2012
Who's the UFO Queen of 2013?
I did a count and discovered that I have 17 UFO's. Know what's funny about that? Before this year, I averaged one UFO for every year that I have been quilting. This year, I DOUBLED that, mostly because I quit my job and have more time to sew. And don't get me wrong, I have actually finished a lot of stuff this year! But I started a lot of stuff too, which all needs to be finished. And I know that I'm not the only one that has a ton of unfinished projects in my stash. So....
I started a facebook group to help people get in the spirit of digging them out, documenting them, and FINISHING some of them. And there's a little friendly competition too. No prizes, just bragging rights if you're the UFO Queen of 2013!
If you have any UFO's (doesn't matter if it's 2, or 17, or 106!) feel free to come join the group. You can find it here:
http://www.facebook.com/groups/UFOQueen2013
But, be prepared to unearth all those UFO's and write them all down! We are an embarrassment, guilt, and judgement free zone, all there for the same reason. And just think, once you've got all those projects done, how many goodies you'll have to give as gifts during the next holiday season!
I started a facebook group to help people get in the spirit of digging them out, documenting them, and FINISHING some of them. And there's a little friendly competition too. No prizes, just bragging rights if you're the UFO Queen of 2013!
If you have any UFO's (doesn't matter if it's 2, or 17, or 106!) feel free to come join the group. You can find it here:
http://www.facebook.com/groups/UFOQueen2013
But, be prepared to unearth all those UFO's and write them all down! We are an embarrassment, guilt, and judgement free zone, all there for the same reason. And just think, once you've got all those projects done, how many goodies you'll have to give as gifts during the next holiday season!
Wednesday, December 26, 2012
Final photos of the Quillow!
It feels like it took FOREVER, but it's finally finished! I finished stitching the binding down at about 1pm on Christmas Eve, while my hubby was hiding in the basement putting a game table together for our boys. I still even had time to make some cookies and do some last minute shopping and wrapping, and make pizza for our traditional Christmas Eve dinner. I'm so glad it didn't take me even longer to finish it!
Anyway, here's a couple pictures of the finished quilt. You can see them on Facebook also, if you follow me on my page Quilting for Sanity.
This is the quillow, all folded up into a pillow that's a little bigger than a standard bed pillow. I appliqued this green Beetle on here, it's meant to look like the first Beetle he ever owned. I also added a green stripe all the way around the edge of the pillow pocket, you can kind of see it there at the bottom.


I'm quite happy with the finished quilt, and so is my hubby! We have 2 quillows already, but he's been asking me to make one that folded into a bed sized pillow for years. I did the math on it a couple years ago, but just recently finally got around to putting one together for him. I thought it would be an appreciated Christmas gift!
I hope to have a tutorial posted soon to my Craftsy page (though hubby doesn't want me to include the Beetle block since that makes his "special"!)
Anyway, here's a couple pictures of the finished quilt. You can see them on Facebook also, if you follow me on my page Quilting for Sanity.
This is the quillow, all folded up into a pillow that's a little bigger than a standard bed pillow. I appliqued this green Beetle on here, it's meant to look like the first Beetle he ever owned. I also added a green stripe all the way around the edge of the pillow pocket, you can kind of see it there at the bottom.

And here it is, all unfolded. It's 29 strips, with black and different shades of blue and teal. The back is a dark blue microfiber topsheet that we never used. I also sacrificed a matching pillowcase to back the pocket with so it would match up when it's unfolded like this.

I'm quite happy with the finished quilt, and so is my hubby! We have 2 quillows already, but he's been asking me to make one that folded into a bed sized pillow for years. I did the math on it a couple years ago, but just recently finally got around to putting one together for him. I thought it would be an appreciated Christmas gift!
I hope to have a tutorial posted soon to my Craftsy page (though hubby doesn't want me to include the Beetle block since that makes his "special"!)
Saturday, December 22, 2012
Time to make a pocket!
Today I started the pocket part of the quillow I'm making my husband for christmas. He's a VW enthusiast, so I thought I'd do something with that. I have had an applique pattern I drew of a Beetle sitting in limbo on my hard drive for over a year, so I dug that out, blew it up to a bigger block, and today I got it cut and partially stitched down. Here's a photo I took earlier today. Some pieces were sewn together, but nothing was sewn down to the block yet, so it's a little wonky looking. But you get the idea!

It's coming out really well, so I hope that this one will go up on my Craftsy store at the same time the quillow pattern and the stained glass pattern do.
Don't forget the Craftsy Christmas sale! Classes are up to 75% off thru midnight Christmas Eve! Craftsy has been totally amazing. I've been able to design and immediately release new patterns to a HUGE audience via their indie shop. I hope they're around for a long time!


It's coming out really well, so I hope that this one will go up on my Craftsy store at the same time the quillow pattern and the stained glass pattern do.
Don't forget the Craftsy Christmas sale! Classes are up to 75% off thru midnight Christmas Eve! Craftsy has been totally amazing. I've been able to design and immediately release new patterns to a HUGE audience via their indie shop. I hope they're around for a long time!
New projects
I've been working really hard the last couple weeks on two projects. One, I've worked on while my husband is at work, and the other, while he's home. I'm still not done with either of them, but I'm done enough to share!
Project #1: Hubby's christmas quillow
 I just finished the quilt part of it last night. You can see Marvin in the corner there, he gives his approval! I still have to trim the raw edges, make the pocket, sew it on, and bind the whole thing, but the hardest part is done. It's a quilt-as-you-go strip quilt, and I did it all on my standard machine. I'm hoping I'll be able to finish most of what's left before he gets home from work today, but I don't even have binding yet! I think I'll be staying up late at least one night between now and Tuesday to finish it.
Project #2: Stained glass quilt pattern

This is a simple fat quarter/fat 16th/scrap quilt pattern I've been working on. My sample piece will be a twin size, and requires 80 blocks. I have 50 done so far, and everything ready to do the rest. As soon as it's done, I'll write up the pattern and add it to my Craftsy store!
So that's what I'm working on. Not to mention that I've had a dress pattern printed and waiting to be laid out and cut for weeks now. Hopefully after Christmas I can get back to my Craftsy classes so I can learn how to properly alter a pattern so it actually fits me.
Speaking of Craftsy...Don't forget the Craftsy Christmas sale is going on till midnight Christmas Eve! All online classes are up to 75% off. And if you can't decide, you can get yourself a gift certificate while the price is low, and decide later (that's what I did!)

Project #1: Hubby's christmas quillow

Project #2: Stained glass quilt pattern

This is a simple fat quarter/fat 16th/scrap quilt pattern I've been working on. My sample piece will be a twin size, and requires 80 blocks. I have 50 done so far, and everything ready to do the rest. As soon as it's done, I'll write up the pattern and add it to my Craftsy store!
So that's what I'm working on. Not to mention that I've had a dress pattern printed and waiting to be laid out and cut for weeks now. Hopefully after Christmas I can get back to my Craftsy classes so I can learn how to properly alter a pattern so it actually fits me.
Speaking of Craftsy...Don't forget the Craftsy Christmas sale is going on till midnight Christmas Eve! All online classes are up to 75% off. And if you can't decide, you can get yourself a gift certificate while the price is low, and decide later (that's what I did!)
Monday, December 17, 2012
Who DOESN'T want to win free fabric for life?

CLICK HERE to enter!
Wednesday, December 12, 2012
Quick goodie bag project
My youngest is in preschool, and Monday I was reminded that Wednesday (that's today!) is his class holiday party, and each kid will have a goodie bag that we're all supposed to drop a stocking stuffer into. Being that it's Christmastime and I'm trying not to spend money I don't have to (since my checking account is just about empty right now!) I decided to try to make something for the kids.
So I raided my stash and found some green Christmas fabric with french horns on it, and an ivory fabric with snowflakes on it. I cut 4x3 inch rectangles out of each. Then I took a cereal box out of my recycle bin and cut a little christmas tree out of it, with a trunk wide enough to allow for stuffing. I traced the tree onto the back of the ivory fabric with a water soluble marker, and then sewed those to the green blocks (right sides together), leaving the bottom of the trunk open. When I got to the point of the tree, I tucked a loop of thin ribbon into it before sewing it down.
Then I trimmed the seams and turned them right side out. My preschooler helped me stuff them (with a bag of stuffing I got from a friend, since it's something I never buy), and then I tucked the edges in and sewed them shut. So here's a pile of 28 christmas tree ornaments I made in about 4 hours Monday afternoon!

The goodie bags had a lot of little candies and dollar store toys and pencils and erasers...almost everything was consumable in some way, or will surely break within a few weeks. But they'll each have this nifty little ornament to keep. :)
It's funny, I didn't even think to put potpourri in them, but I noticed a few parents that pulled them out of the goodie bags to smell them lol! Good thing there's no smokers here! Anyway, if I do this again, maybe I'll think ahead and get something pretty smelling to tuck in there. But I did get lots of compliments, and people saying I'm so talented and things like that. If they only knew how easy this was...The secret's out now!
So I raided my stash and found some green Christmas fabric with french horns on it, and an ivory fabric with snowflakes on it. I cut 4x3 inch rectangles out of each. Then I took a cereal box out of my recycle bin and cut a little christmas tree out of it, with a trunk wide enough to allow for stuffing. I traced the tree onto the back of the ivory fabric with a water soluble marker, and then sewed those to the green blocks (right sides together), leaving the bottom of the trunk open. When I got to the point of the tree, I tucked a loop of thin ribbon into it before sewing it down.
Then I trimmed the seams and turned them right side out. My preschooler helped me stuff them (with a bag of stuffing I got from a friend, since it's something I never buy), and then I tucked the edges in and sewed them shut. So here's a pile of 28 christmas tree ornaments I made in about 4 hours Monday afternoon!

The goodie bags had a lot of little candies and dollar store toys and pencils and erasers...almost everything was consumable in some way, or will surely break within a few weeks. But they'll each have this nifty little ornament to keep. :)
It's funny, I didn't even think to put potpourri in them, but I noticed a few parents that pulled them out of the goodie bags to smell them lol! Good thing there's no smokers here! Anyway, if I do this again, maybe I'll think ahead and get something pretty smelling to tuck in there. But I did get lots of compliments, and people saying I'm so talented and things like that. If they only knew how easy this was...The secret's out now!
Sunday, December 9, 2012
Let it SNOW!
Well, it's ready for download! Come get your Let it Snow! Winter Mug Rug pattern here:
http://www.craftsy.com/pattern/quilting/home-decor/let-it-snow-winter-mug-rug/38934

http://www.craftsy.com/pattern/quilting/home-decor/let-it-snow-winter-mug-rug/38934

Monday, December 3, 2012
My new mug rug pattern will be available soon!
Last week I finished the top to my new mug rug pattern. I just need to get it quilted and bound and get some photos, and then I can get the pattern written up. What do you think?


Tuesday, November 27, 2012

Monday, November 26, 2012
Subscribe to:
Posts (Atom)